Step-by-step process for filing sales tax return in Kansas
Let’s now get right into the steps to file sales and use tax in Kansas. We’ll begin with registering for an account. If you already have an account, feel free to skip to step 2.
Step 1: Create an online account
To begin the process of filing your Kansas sales tax return, you'll need to create an online account with the Kansas Department of Revenue. If you haven't already done so, head over to the Kansas portal and register for a sales tax permit.
Once you've completed the registration form, you'll receive your login credentials, which you'll use to access your account and file your sales tax returns. Keep these credentials in a safe place, as you'll need them each time you log in to file your returns.
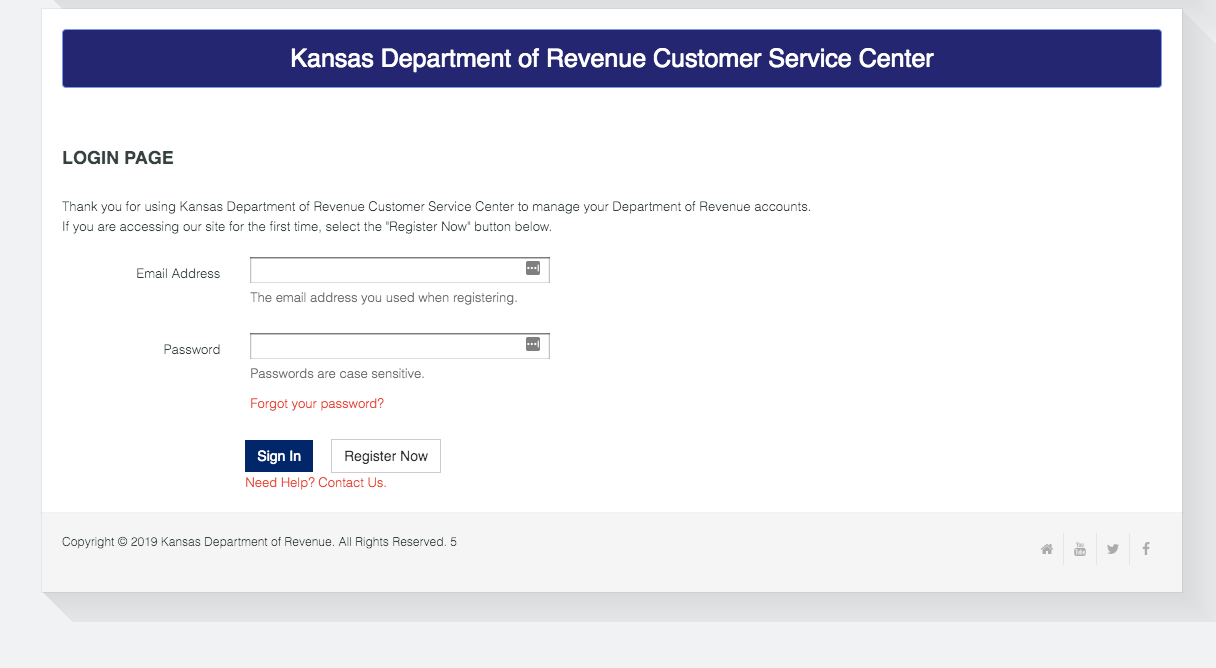
Step 2: Login into your account
With your login credentials in hand, head back to the Kansas portal and sign in to your account.
Simply enter your username and password in the designated fields and click the login button to access your account dashboard.
Step 3: Start your tax return
Upon logging in, you'll be directed to your account dashboard. Take a moment to familiarize yourself with the layout and navigation of the dashboard.

The yellow banner at the top of the page serves as your primary navigation tool, allowing you to move between different sections of the portal.
Click through the various tabs to get a feel for the information available in each section. Be sure to check the "News" tab for any important updates or announcements that may impact your sales tax filing process.
Additionally, keep an eye out for any messages in your inbox, which can be found near the top of the dashboard. If you have any unread messages, take the time to review them before proceeding with your tax return.
When you're ready to begin your tax return, click on the "Account" tab in the yellow banner, and then select the account number associated with the return you wish to file. This will take you to the next step in the filing process.
Step 4: Enter tax details
After selecting your account, you'll be directed to a new page where you'll enter your tax details. Before proceeding, take a moment to verify that the business name displayed at the top of the page is correct. Next, review the bank information provided in the middle of the page.

If the information is accurate and you wish to pay electronically, no further action is needed. However, if you don't see your bank information listed and would like to pay electronically, you'll need to add your bank details at this point.
Once you've verified your business and bank information, click the "File a Retailers Use Tax Return" link to proceed to the next step. Depending on your account, you may see a message appear before entering your sales data. If this message appears, be sure to read it carefully, as it may contain important information for accurately filing your return.
On the next page, you'll be asked to select your filing period and return type. Choose the appropriate options from the dropdown menus to ensure you're filing for the correct period and using the proper return type.

Next, decide whether you want to manually enter your jurisdiction codes or upload your data. If you regularly sell to the same locations, manually selecting your jurisdiction codes may be the most efficient option.
If you choose to manually select your jurisdiction codes, you'll be presented with a screen similar to the one shown in the image above. To add your jurisdictions, click the "Add Jurisdictions" button. Enter the jurisdiction code and press enter. The jurisdiction will appear below the entry field. Check the box next to the jurisdiction and click "Add Selected" to add it to your return.

Repeat this process for each jurisdiction where you made sales during the filing period. This may be the most time-consuming part of the filing process, so be sure to allow yourself enough time to enter all the necessary information.

After adding your jurisdictions, go back and enter your gross sales and any applicable deductions for each jurisdiction. Using the tab key to move between the entry fields can help streamline this process.
When you've finished entering your data, click the "Calculate" button at the bottom of the page. Take a moment to double-check your total gross sales and tax due against your own records to ensure accuracy. If everything looks correct, click "Continue" to move on to the next step.

On the following page, you'll see Part II of your tax return. Review each line item carefully, even if you don't have any information to enter on this page. Once you've reviewed the information, click "Continue" to proceed.
The next page provides a summary of your tax return. If you have a credit for overpayment, enter the amount on line 5. If you're filing your return on time, there should be no penalty or interest due. However, if your return is late, click the "Help" link to determine the appropriate penalty and interest amounts to include.

Click "Continue" to move on to the payment options. Congratulations! You've completed the data entry portion of your Kansas sales tax return.
Step 5: Submit payment
If you wish to pay your sales tax due at the same time you submit your return, select that option on the payment page. Keep in mind that at this point, you haven't actually submitted your return yet, this is the page immediately preceding submission.
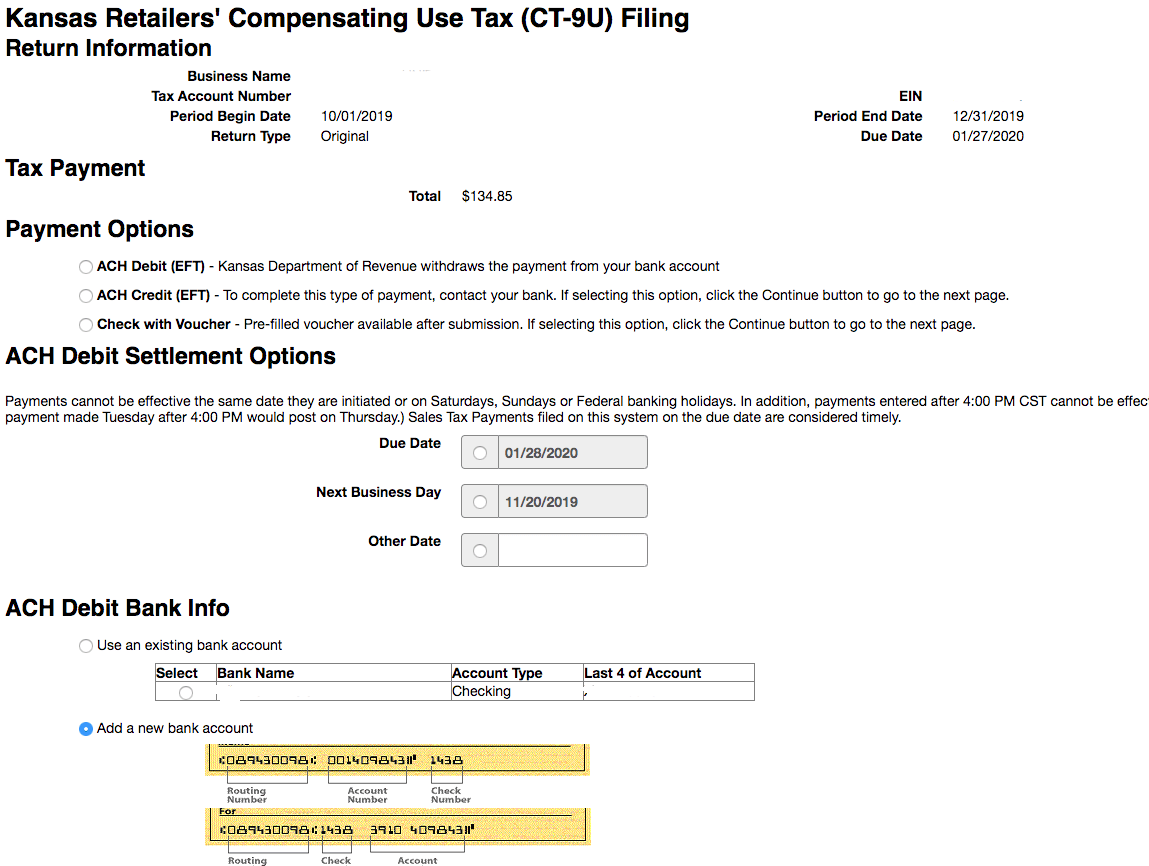
Kansas allows you to submit both your payment and your return simultaneously. If you've already entered your bank information, it should appear as a selectable option on this page. Be sure to choose the correct payment date, which should be no later than the due date of your return to avoid incurring late fees.
Once you've confirmed that all the information on the payment page is accurate, click "Continue" to complete the submission of your return and payment.
Step 6: Finalize filing
Congratulations! You've successfully filed your Kansas sales tax return and submitted your payment. However, there are a few final things to consider after completing the filing process.

If you forgot to print or save a copy of your sales tax return, don't worry – you can still access and print a copy of your filed return. To do so, navigate back to your account dashboard and click the "Accounts" link in the yellow banner. Select the account number associated with the return you wish to print, and then click "View Account History" at the bottom of the page.
Locate the return you just filed and click "View" on the left side of the entry. From here, click "Print" at the bottom of the screen to print a copy of your return for your records.
Local sales tax
In addition to the state sales tax rate of 6.5%, many cities and local jurisdictions in Kansas impose their own sales taxes. These local taxes can vary widely, resulting in combined sales tax rates of up to 10.5% in some areas. Here are the current sales tax rates for a few major cities in Kansas:
When filing your Kansas sales tax return, it's essential to ensure that you're collecting and remitting the correct amount of tax for each jurisdiction in which you conduct business. Keeping accurate records of your sales and the applicable tax rates can help simplify the filing process and prevent errors that could lead to penalties or interest charges.
Filing Sales Tax in Kansas FAQs
What is the frequency of sales tax filing in Kansas?
The frequency of your Kansas sales tax filings depends on the volume of your sales. The Kansas Department of Revenue will assign you a filing frequency – either monthly, quarterly, or annually – based on your sales tax liability. Be sure to file your returns in accordance with your assigned frequency to remain compliant.
Can I file my Kansas sales tax return by mail?
Yes, you have the option to file your Kansas sales tax return by mail using the paper forms provided by the Department of Revenue. However, the Department encourages electronic filing through their Customer Service Center, as it offers faster processing times and added convenience.
What happens if I miss the sales tax filing deadline in Kansas?
If you fail to file your Kansas sales tax return by the assigned due date, you may be subject to penalties and interest on the unpaid tax amount. To avoid these additional charges, always aim to file and pay your sales tax on time.
Do I need to file a sales tax return in Kansas if I didn't make any sales?
Yes, even if you didn't make any sales or owe any tax during a given filing period, you're still required to file a return if you have an active sales tax permit in Kansas. In this case, you would file what's known as a "zero return," which simply reports zero sales and zero tax due for the period.
Are SaaS products taxable in Kansas?
No, SaaS products aren't taxable in Kansas, however, traditional downloadable software is.
Skip the tax compliance headaches with Numeral
If you're a business owner in Kansas, you know how challenging it can be to keep up with sales tax compliance. With complex rules and regulations, it's easy to feel overwhelmed. But what if you could simplify the process and spend less than five minutes a month on sales tax?
That's Numeral.
Numeral is a white-glove sales tax service that takes care of everything from monitoring your sales to registering your business in new states. We’ll even manage your tax collection settings and handle your monthly, quarterly, and annual filings.
With Numeral, you can say goodbye to the stress and hassle of sales tax compliance.
Don't let sales tax hold you back any longer. Book your demo with Numeral today and discover how easy compliance can be. Let them handle the details, so you can get back to what matters most—running your business.